Keyboard navigation with only HTML
A short guide about accessibility based on a real project.
I don’t often talk about accessibility, but this post is based on a task I had to complete during my first job as a freelance web developer. I was asked to work on an existing website in order to create a keyboard navigation system. Huge challenge because before that, I had never done such exercise and I knew few things about keyboard navigation.
So I learnt on the job about the best practices on making a website that can be used only with a keyboard. Not only I learnt about how to do that but I also learnt about accessibility which is an important thing in web development.
So I wanted to share here what I learned. The way I found was perfectly answering the required need but there are probably different ways to do this (tweet me @bellanger_q on how you would do that).
Web accessibility
Before going into technical writing, let’s talk a bit about web accessibility and keyboard navigation. Why a website should be accessible by keyboard only when everyone has either a mouse or a trackpad or (or a mobile)? Wrong, this statement is not true. That’s why a website, sometimes, should be accessible from everywhere, on every device, with every equipment. Mouse, keyboard, mobile, computer, tablet, screen reader…with the best user experience as possible.
It doesn’t concern all websites. In general, websites about medical activities or governments websites require to be read by everyone and are the most accessible as possible. You can often spot on these websites a font-size modifier, different available languages, audio navigation, a color-blind mode etc. In a word, they respect many web accessibility standards which are not necessary for personal websites for example.
Despite not every website needs this, it’s still useful in my opinion to have some rudiments about how to implement a keyboard navigation on your potential next project.
Creating the navigation
The goal was to allow visitors to browse the website, to execute actions and to access all the features with only their keyboard. I’ll explain step by step the technique I used and talk about what makes this possible.
Just one HTML attribute
To make an HTML elements selectable by keyboard, it just needs to have a special attribute. This attribute is called tabindex. It’s an HTML attribute who was originally only available for links, buttons and inputs. Today with HTML5, every element can get tabindex.
The value that it is expecting is a integer. From 1 to X (actually, it can have negative value but in our case, it will be useless. See more). It represents the tabbing order of the element between all elements with tabindex attribute.
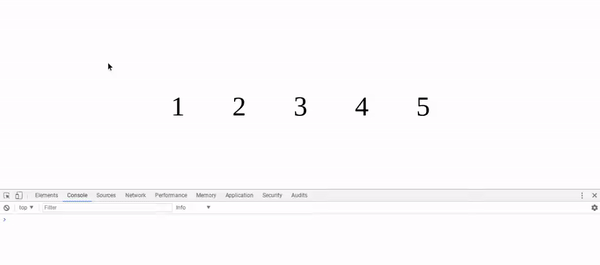
As an example, here we have 5 <p> tags with different tabindex values that goes from 1 to 200. You can see how it is implemented:
<p id="one" tabindex="1">1</p>
<p id="two" tabindex="2">2</p>
<p id="three" tabindex="50">3</p>
<p id="four" tabindex="200">4</p>
<p id="five" tabindex="3">5</p>
Using tabindex
Now that you know how to prepare your HTML elements to be navigable, you could ask about how to use it? 2 keys of your keyboard are enough for that: TAB and SHIFT. It works like this:
- Press TAB and you will go through every elements with the
tabindexattribute set from smallest to biggest value. - Press SHIFT + TAB and you will go through every elements with the
tabindexattribute set from biggest to smallest value.
If you look back at the previous example, try to guess in which order they will be selected with the TAB key? As you can see in the demo below, the answer is: 1, 2, 5, 3, 4. Every time you press TAB, the browser is smart enough to jump to the next tabindex value (1, 2, 3, 50, 200). It doesn’t need to be continuous.
Now you can navigate between all elements with tabindex attribute and use the website like you would do with a mouse! Congrats, it was easy. But that’s not enough to know.
What does it mean?
If you are going to implement such keyboard navigation, you have to respect some conditions. Making your website more accessible is a thing, but you have to do it in a good way! Otherwise, it can create the opposite effect and deteriorate the user experience.
Navigation order
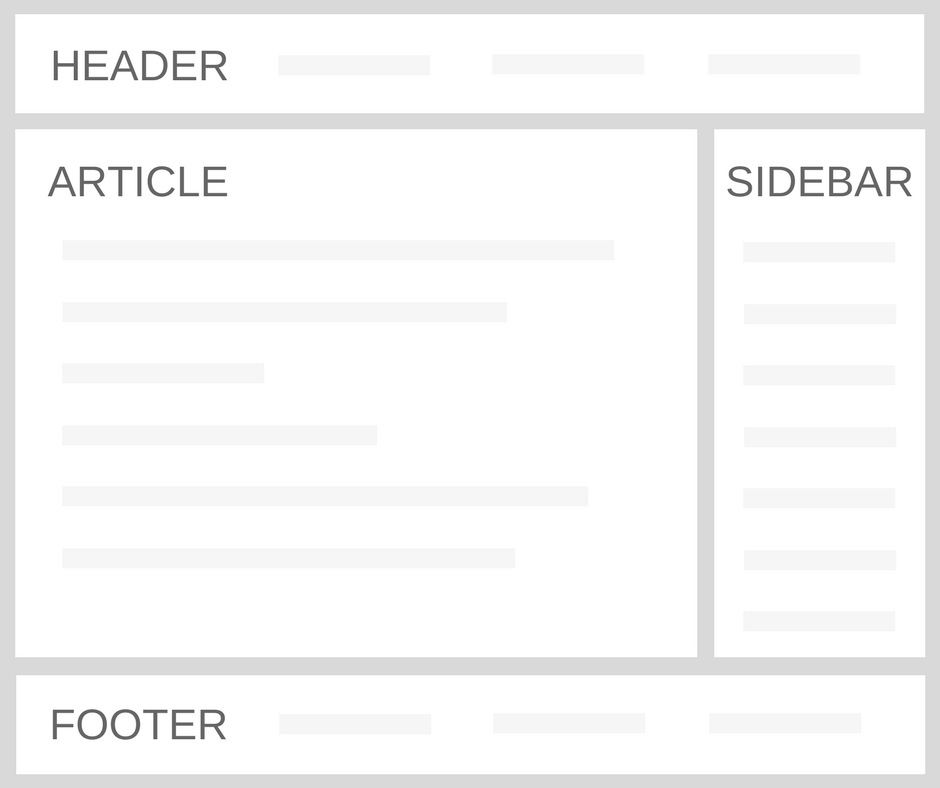
When you’re browsing a website using your keyboard and the TAB key, the selected items follow by default the HTML document order from top to bottom.
Except if you have special instructions, try not to disturb the logical order of elements and keep your navigation fluid. Header first, then main article followed by sidebar and footer… Try to make it the same way as you would read the page.
Focus state
Every time you press TAB, the selected element is receiving the :focus state in CSS which comes with a default property that you probably know: outline. It provides a visual indicator (often a blue square, depending on your browser) around focused items like links, inputs, buttons. It means “this item is selected”. Every time you press TAB, next item will receive the blue indicator. It’s true: the default indicator is ugly and sometimes you just want to remove it. But hiding it is a bad idea because it’s the only way for people using keyboard to know where they are on the webpage.
What to do? You can style the focused element with other CSS properties (this way: selector:focus { background: red }) so it will look the way you want and it will be visible. But remember to never set outline: none or outline: 0 if you don’t add other styling properties to focused elements. If you do so, you won’t know what item is focused and people could get lost. It’s contrary to the aim of accessibility.
Help section
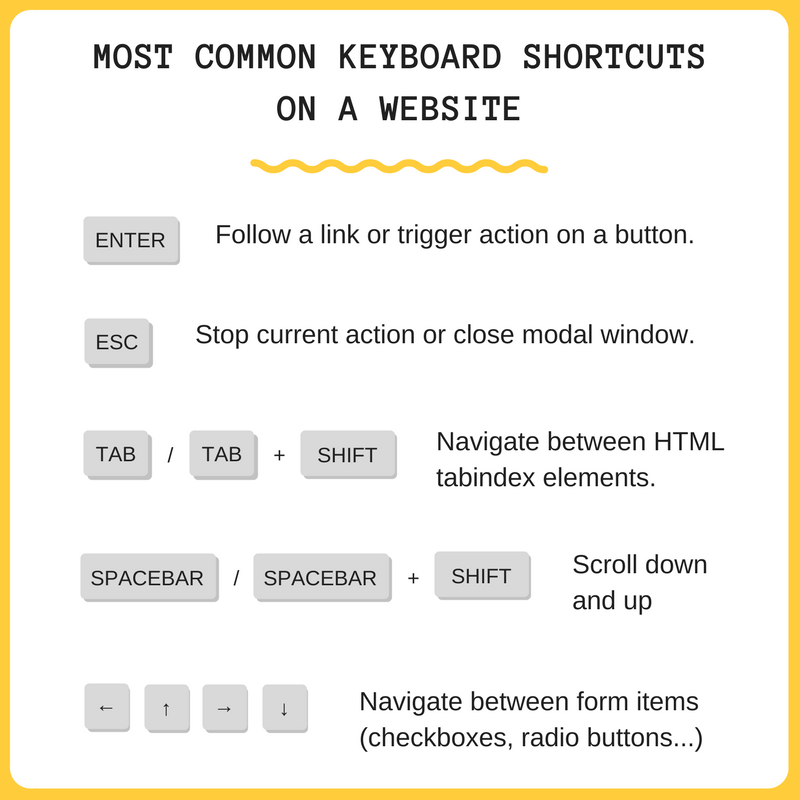
If you’re changing navigation order, adding keyboard shortcuts (you can find a list of most common keyboard interactions below) or making some important and non-obvious accessibility changes to your webpage, you have to tell your visitors. Put somewhere in your page a “Help” section with a small guide about how to use and browse the website with the keyboard. It can contain:
- How to navigate with TAB and SHIFT + TAB,
- All the keyboard shortcuts for special actions,
- Where to find this help section,
- Others instructions about using the website.
As you could see, setting up a keyboard navigation system is quite easy and fast with HTML. You basically just need to add one attribute to tags. I am sure that there are many other ways to do it so please tell me in the comment section. I’m also here to learn!
It’s not mandatory to have this accessibility feature on every website but in case it’s needed, this is a good way to do it.